

Robert Harker <harker@harker.com>
North Bay Linux Users Group
January 13, 2015
The slides are available at: http://harker.com/Talks/linux-bridging/


Linux Bridging In A Virtualized Environment by
Robert Harker
is licensed under a
Creative Commons Attribution 3.0 Unported License.
Hit the space bar or swipe left for next slide
Understanding the mysteries and wonders of Linux Bridging:
We are ignoring IPv6 and the iproute2 bridge command in this talk
Robert Harker:
Unix gray beard sysadmin
Converted to Linux in the late 1990's
Taught TCP/IP networking at UCSC Extension in the early 1990's
Interested in OpenStack. Built my own 5 node stack: cloud5.harker.com
Interested in DevOps. Worked in Yahoo Sports as they automated
Slides prepared using vi and W3C Slidy,
A 6 file CSS styles sheets and Java script presentation system/template.
Linux bridging creates device nodes in the kernel that behave the same as physical hardware
This allows all the standard networking tools and libraries to work without change
Think of a Linux bridge device as a dumb Ethernet hub,
It forwards packets to anything connected to the bridge
Originally created to support VPN (I think)
Virtual Private Networking, VPN, needs to have a private sub-net so they can route remote traffic through the VPN encryption interface
Physical segments are implemented in real hardware:
Virtual segments are implemented in software:
Maps the mac address of an interface to the device name:
/etc/udev/rules.d/70-persistent-net.rules:
# PCI device 0x10de:0x0373 (forcedeth)
SUBSYSTEM=="net", ACTION=="add", DRIVERS=="?*", ATTR{address}=="00:03:25:44:99:b6", \
ATTR{type}=="1", KERNEL=="eth*", NAME="eth0"
Configures the eth0 interface (RHEL/CentOS):
/etc/sysconfig/network-scripts/ifcfg-eth0:
DEVICE="eth0"
TYPE="Ethernet"
HWADDR="00:03:25:44:99:B6"
ONBOOT="yes"
IPADDR="10.5.0.196"
PREFIX="24"
GATEWAY="10.5.0.254"
If using Linux bridges it is wise to not use NetworkManager:
yum erase NetworkManager\*
The good old fashion ifconfig command:
# ifconfig eth0
eth0      Link encap:Ethernet  HWaddr 00:03:25:44:99:B6
          inet addr:10.5.0.196  Bcast:10.5.0.255  Mask:255.255.255.0
          inet6 addr: fe80::203:25ff:fe44:99b6/64 Scope:Link
          UP BROADCAST RUNNING MULTICAST  MTU:1500  Metric:1
          RX packets:13 errors:0 dropped:0 overruns:0 frame:0
          TX packets:35 errors:0 dropped:0 overruns:0 carrier:0
          collisions:0 txqueuelen:1000
          RX bytes:2218 (2.1 KiB)  TX bytes:3370 (3.2 KiB)
          Interrupt:24 Base address:0xa000
The spiffy "all in one" ip command:
ip address show dev eth0
2: eth0: <BROADCAST,MULTICAST,UP,LOWER_UP> mtu 1500 qdisc pfifo_fast state UNKNOWN qlen 1000
    link/ether 00:03:25:44:99:b6 brd ff:ff:ff:ff:ff:ff
    inet 10.5.0.196/24 brd 10.5.0.255 scope global eth0
    inet6 fe80::203:25ff:fe44:99b6/64 scope link
       valid_lft forever preferred_lft forever
brctl is the standard bridge configuration tool
The package bridge-utils installs the brctl command:
yum install bridge-utils
bridge is part of iproute2 package
My understanding is that bridge is a command shell
wrapped around the iproute2 bridge management API.
We do not talk about the bridge command anymore
Comparison of brctl and bridge commands:
http://sgros-students.blogspot.com/2013/11/comparison-of-brctl-and-bridge-commands.html
Delete an IP address from the physical interface
# ip addr del 10.5.0.196/24 dev eth0
Create the virtual bridge
# brctl addbr br-ex
Add physical interface to virtual bridge
# brctl addif br-ex eth0
Display information about the bridge
# brctl show
bridge name	bridge id		STP enabled	interfaces
br-ex		8000.0003254499b6	no		eth0

# brctl showmacs br-ex
port no	mac addr		is local?	ageing timer
  1	00:03:25:44:99:b6	yes		   0.00
Add an IP address to the bridge
ip addr add 10.5.0.196/24 dev br-ex
# ifconfig eth0
eth0      Link encap:Ethernet  HWaddr 00:03:25:44:99:B6
          inet6 addr: fe80::203:25ff:fe44:99b6/64 Scope:Link
          UP BROADCAST RUNNING MULTICAST  MTU:1500  Metric:1
          RX packets:13 errors:0 dropped:0 overruns:0 frame:0
          TX packets:65 errors:0 dropped:0 overruns:0 carrier:0
          collisions:0 txqueuelen:1000
          RX bytes:2218 (2.1 KiB)  TX bytes:5642 (5.5 KiB)
          Interrupt:24 Base address:0xa000

# ifconfig br-ex
br-ex     Link encap:Ethernet  HWaddr 00:03:25:44:99:B6
          inet addr:10.5.0.196  Bcast:10.5.0.255  Mask:255.255.255.0
          inet6 addr: fe80::203:25ff:fe44:99b6/64 Scope:Link
          UP BROADCAST RUNNING MULTICAST  MTU:1500  Metric:1
          RX packets:0 errors:0 dropped:0 overruns:0 frame:0
          TX packets:10 errors:0 dropped:0 overruns:0 carrier:0
          collisions:0 txqueuelen:0
          RX bytes:0 (0.0 b)  TX bytes:636 (636.0 b)
Note: Physical interfaces have interrupts, bridge devices do not
DEVICE="eth0"
TYPE="Ethernet"
HWADDR="00:03:25:44:99:B6"
ONBOOT="yes"
BRIDGE="br-ex"
# No IPADDR related settings
DEVICE="br-ex"
TYPE="Bridge"
ONBOOT="yes"
# IPADDR set for bridge interface
IPADDR="10.5.0.196"
PREFIX="24"
GATEWAY="10.5.0.254"
If an internal bridge is not connected to a IP forwarding node, then the bridge is an isolated subnet.
An IP forwarding or router node is required for hosts on the bridge to communicate with hosts on other networks:
Install the virtualization packages with yum:
hypervisor# yum install libvirt virt-manager qemu-img qemu-kvm qemu-kvm-tools
The qemu-guest-agent package should be installed in your guest images:
hostA# yum install qemu-guest-agent
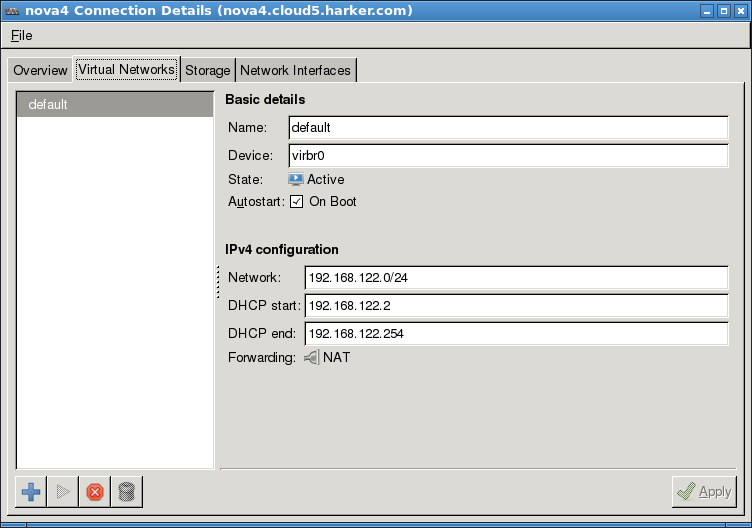
When you install Qemu a default virtual network is created:

# brctl show
bridge name	bridge id		STP enabled	interfaces
br-ex		8000.0003254499b6	no		eth0
virbr0		8000.525400aad8a5	yes		virbr0-nic

# brctl showmacs virbr0
port no	mac addr		is local?	ageing timer
  1	52:54:00:aa:d8:a5	yes		   0.00
# ip address show dev virbr0
5: virbr0: <BROADCAST,MULTICAST,UP,LOWER_UP> mtu 1500 qdisc noqueue state UNKNOWN
    link/ether 52:54:00:aa:d8:a5 brd ff:ff:ff:ff:ff:ff
    inet 192.168.122.1/24 brd 192.168.122.255 scope global virbr0

# ip address show dev virbr0-nic
6: virbr0-nic: <BROADCAST,MULTICAST> mtu 1500 qdisc noop state DOWN qlen 500
    link/ether 52:54:00:aa:d8:a5 brd ff:ff:ff:ff:ff:ff
# ip route
10.5.0.0/24      dev br-ex   proto kernel  scope link  src 10.5.0.196
192.168.122.0/24 dev virbr0  proto kernel  scope link  src 192.168.122.1
default via 10.5.0.254 dev br-ex
# ps ax | grep dnsmasq | grep -v grep
1726 ?        S      0:00 /usr/sbin/dnsmasq --strict-order \
    --pid-file=/var/run/libvirt/network/default.pid --conf-file= --except-interface lo --bind-interfaces \
    --listen-address 192.168.122.1 --dhcp-range 192.168.122.2,192.168.122.254 \
    --dhcp-leasefile=/var/lib/libvirt/dnsmasq/default.leases --dhcp-lease-max=253 --dhcp-no-override \
    --dhcp-hostsfile=/var/lib/libvirt/dnsmasq/default.hostsfile \
    --addn-hosts=/var/lib/libvirt/dnsmasq/default.addnhosts
iptables -L -t nat
. . .
Chain POSTROUTING (policy ACCEPT)
target     prot opt source               destination
MASQUERADE  tcp  --  192.168.122.0/24    !192.168.122.0/24    masq ports: 1024-65535
MASQUERADE  udp  --  192.168.122.0/24    !192.168.122.0/24    masq ports: 1024-65535
MASQUERADE  all  --  192.168.122.0/24    !192.168.122.0/24
. . .
The default.xml file defines the default bridge virbr0
This file is linked into /etc/libvirt/qemu/networks/autostart so the bridge will be created when the system boots
/etc/libvirt/qemu/networks/default.xml:
<network>
  <name>default</name>
  <uuid>add42c9b-eca6-456d-8e94-605a64d0091f</uuid>
  <bridge name="virbr0" />
  <mac address='52:54:00:AA:D8:A5'/>
  <forward/>
  <ip address="192.168.122.1" netmask="255.255.255.0">
    <dhcp>
      <range start="192.168.122.2" end="192.168.122.254" />
    </dhcp>
  </ip>
</network>
Hint: you can create unique UUIDs with uuidgen:
# uuidgen
bbb2bfbd-e8a9-4004-b2ff-07f6cbfb5a3b
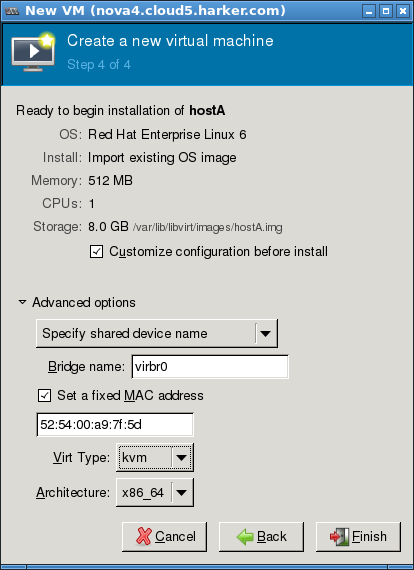
Use virt-manage to create a two node network connected to virbr0
Verify network configuration:
Advanced options:
Specify shared device name
Bridge name: virbr0

brctl shows that two new interfaces have been created on virbr0
# brctl show virbr0
bridge name	bridge id		STP enabled	interfaces
virbr0		8000.525400aad8a5	yes		virbr0-nic
							vnet0
							vnet1
# brctl showmacs virbr0
port no	mac addr		is local?	ageing timer
  1	52:54:00:aa:d8:a5	yes		   0.00
  3	fe:54:00:14:e3:04	yes		   0.00
  2	fe:54:00:a9:7f:5d	yes		   0.00
ip shows these configured interfaces
Note: no IP addresses are assigned to vnet0 or vnet1
# ip address
. . .
8: vnet0: <BROADCAST,MULTICAST,UP,LOWER_UP> mtu 1500 qdisc pfifo_fast state UNKNOWN qlen 500
    link/ether fe:54:00:a9:7f:5d brd ff:ff:ff:ff:ff:ff
    inet6 fe80::fc54:ff:fea9:7f5d/64 scope link
       valid_lft forever preferred_lft forever
9: vnet1: <BROADCAST,MULTICAST,UP,LOWER_UP> mtu 1500 qdisc pfifo_fast state UNKNOWN qlen 500
    link/ether fe:54:00:14:e3:04 brd ff:ff:ff:ff:ff:ff
    inet6 fe80::fc54:ff:fe14:e304/64 scope link
       valid_lft forever preferred_lft forever
The dnsmasq default.leases shows the IP addresses assigned to the two instances
# cat /var/lib/libvirt/dnsmasq/default.leases
1400098542 52:54:00:14:e3:04 192.168.122.110 * *
1400098843 52:54:00:a9:7f:5d 192.168.122.133 * *
virsh can show information about virtual networks:
virsh # net-list
Name                 State      Autostart     Persistent
--------------------------------------------------
default              active     yes           yes

virsh # net-info default
Name            default
UUID            0bd45d0a-be77-4c7d-aa33-426c025196be
Active:         yes
Persistent:     yes
Autostart:      yes
Bridge:         virbr0
virsh can show information about virtual interfaces on an instance:
virsh # domiflist hostA
Interface  Type       Source     Model       MAC
-------------------------------------------------------
vnet0      bridge     virbr0     virtio      52:54:00:a9:7f:5d

virsh # domifstat hostA vnet0
vnet0 rx_bytes 11235011
vnet0 rx_packets 8852
vnet0 rx_errs 0
vnet0 rx_drop 0
vnet0 tx_bytes 54692
vnet0 tx_packets 785
vnet0 tx_errs 0
vnet0 tx_drop 0
virsh is a command line tool to manage libvirt resources
Part of libvirt-client package
The eth0 device looks like a normal Ethernet interface:
Note: There is no "Interrupt:" line because it is a virtual interface
hostA ~ # ifconfig eth0
eth0      Link encap:Ethernet  HWaddr 52:54:00:A9:7F:5D
          inet addr:192.168.122.133  Bcast:192.168.122.255  Mask:255.255.255.0
          inet6 addr: fe80::5054:ff:fea9:7f5d/64 Scope:Link
          UP BROADCAST RUNNING MULTICAST  MTU:1500  Metric:1
          RX packets:10702 errors:0 dropped:0 overruns:0 frame:0
          TX packets:999 errors:0 dropped:0 overruns:0 carrier:0
          collisions:0 txqueuelen:1000
          RX bytes:11347743 (10.8 MiB)  TX bytes:84647 (82.6 KiB)
hostA ~ # ip address show dev eth0
2: eth0: <BROADCAST,MULTICAST,UP,LOWER_UP> mtu 1500 qdisc pfifo_fast state UP qlen 1000
    link/ether 52:54:00:a9:7f:5d brd ff:ff:ff:ff:ff:ff
    inet 192.168.122.133/24 brd 192.168.122.255 scope global eth0
    inet6 fe80::5054:ff:fea9:7f5d/64 scope link
       valid_lft forever preferred_lft forever
The instance has a default route through the hypervisor host 192.168.122.1:
hostA ~ # ip route
192.168.122.0/24 dev eth0  proto kernel  scope link  src 192.168.122.133
169.254.0.0/16 dev eth0  scope link  metric 1002
default via 192.168.122.1 dev eth0
What is this?
Is this a Sun extension?
Disable by adding to /etc/sysconfig/network:
NOZEROCONF=yes
tcpdump can be used to monitor traffic on a virtual bridge:
hypervisor# tcpdump -i virbr0
tcpdump: verbose output suppressed, use -v or -vv for full protocol decode
listening on virbr0, link-type EN10MB (Ethernet), capture size 65535 bytes
> hostA# ping 192.168.122.110
12:38:31.278548 ARP, Request who-has 192.168.122.110 tell 192.168.122.133, length 28
12:38:31.279019 ARP, Reply 192.168.122.110 is-at 52:54:00:14:e3:04 (oui Unknown), length 28
12:38:31.279146 IP 192.168.122.133 > 192.168.122.110: ICMP echo request, id 29444, seq 1, length 64
12:38:31.279792 IP 192.168.122.110 > 192.168.122.133: ICMP echo reply, id 29444, seq 1, length 64
12:38:32.279219 IP 192.168.122.133 > 192.168.122.110: ICMP echo request, id 29444, seq 2, length 64
12:38:32.279452 IP 192.168.122.110 > 192.168.122.133: ICMP echo reply, id 29444, seq 2, length 64
Very useful for debugging networking problems
hostA's virtual NIC is defined in its qemu hostA.xml file
In the <interface></interface> stanza
/etc/libvirt/qemu/hostA.xml:
<domain type='kvm'>
  <name>hostA</name>
. . .
    <interface type='bridge'>
      <mac address='52:54:00:a9:7f:5d'/>
      <source bridge='virbr0'/>
      <target dev='vnet0'/>
      <model type='virtio'/>
      <alias name='net0'/>
      <address type='pci' domain='0x0000' bus='0x00' slot='0x03' function='0x0'/>
    </interface>
. . .
</domain>
You can dump the current running in memory copy of this XML with virsh:
virsh # dumpxml hostA
In a traditional 3 layer web site design you have:
All three types of nodes talk to each other over a private internal network
Only the FE nodes received incoming TCP/IP connections from the Internet
In a production "all in one" virtualized environment the web site will have:
The private virtual network will have outgoing access to the Internet via the hypervisor
The hypervisor hosts will perform iptables NATing for the virtual subnet
ssh access to the instances on the private virtual subnet is left as an exercise for the student
Hint: It involves IP routing
I call this collection of 3 instances and a private subnet a "runway"
It has all the pieces needed to run the web site application in development mode
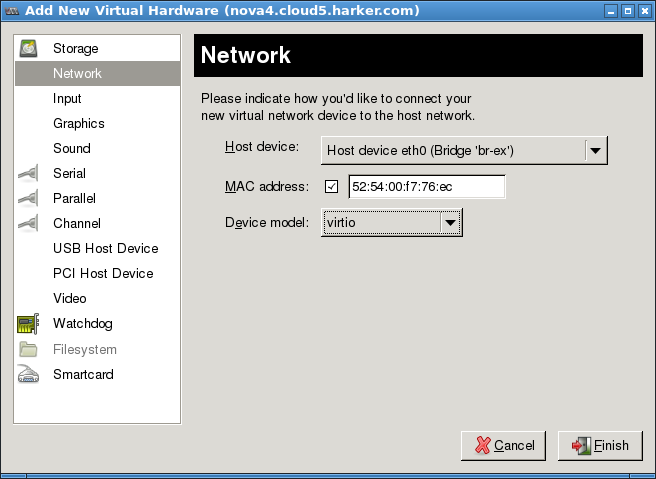
Host device: Host device eth0 (Bridge br-ex)
Device model: virtio
Reboot the instance for changes to take effect

After rebooting the instance inspect its network configuration:
hostA ~ # ip address
. . .
2: eth0: <BROADCAST,MULTICAST,UP,LOWER_UP> mtu 1500 qdisc pfifo_fast state UP qlen 1000
    link/ether 52:54:00:a9:7f:5d brd ff:ff:ff:ff:ff:ff
    inet 192.168.122.133/24 brd 192.168.122.255 scope global eth0
    inet6 fe80::5054:ff:fea9:7f5d/64 scope link
       valid_lft forever preferred_lft forever
3: eth1: <BROADCAST,MULTICAST,UP,LOWER_UP> mtu 1500 qdisc pfifo_fast state UP qlen 1000
    link/ether 52:54:00:f7:76:ec brd ff:ff:ff:ff:ff:ff
    inet6 fe80::5054:ff:fef7:76ec/64 scope link
       valid_lft forever preferred_lft forever
Note: No IP address assigned to eth1
hostA ~ # ifconfig eth1
eth1      Link encap:Ethernet  HWaddr 52:54:00:F7:76:EC
          inet6 addr: fe80::5054:ff:fef7:76ec/64 Scope:Link
          UP BROADCAST RUNNING MULTICAST  MTU:1500  Metric:1
          RX packets:36 errors:0 dropped:0 overruns:0 frame:0
          TX packets:39 errors:0 dropped:0 overruns:0 carrier:0
          collisions:0 txqueuelen:1000
          RX bytes:6772 (6.6 KiB)  TX bytes:4262 (4.1 KiB)
Note: There is no "Interrupt:" line because it is a virtual interface
Configure the interfaces to use dhcp and set the default route through eth1, the external interface
/etc/sysconfig/network-scripts/ifcfg-eth0"
DEVICE="eth0"
BOOTPROTO="dhcp"
ONBOOT="yes"
TYPE="Ethernet"
# Note: no HWADDR or UUID
IPV4_FAILURE_FATAL=yes
IPV6INIT=no
LAST_CONNECT=1397607178
/etc/sysconfig/network-scripts/ifcfg-eth1:
DEVICE="eth1"
TYPE="Ethernet"
ONBOOT="yes"
BOOTPROTO="dhcp"
# Note: no HWADDR or UUID
DEFROUTE=yes
PEERDNS=yes
PEERROUTES=yes
IPV4_FAILURE_FATAL=yes
IPV6INIT=no
LAST_CONNECT=1397607178
hostA ~ # ip address
. . .
2: eth0: <BROADCAST,MULTICAST,UP,LOWER_UP> mtu 1500 qdisc pfifo_fast state UP qlen 1000
    link/ether 52:54:00:a9:7f:5d brd ff:ff:ff:ff:ff:ff
    inet 192.168.122.133/24 brd 192.168.122.255 scope global eth0
    inet6 fe80::5054:ff:fea9:7f5d/64 scope link
       valid_lft forever preferred_lft forever
3: eth1: <BROADCAST,MULTICAST,UP,LOWER_UP> mtu 1500 qdisc pfifo_fast state UP qlen 1000
    link/ether 52:54:00:f7:76:ec brd ff:ff:ff:ff:ff:ff
    inet 10.5.0.37/24 brd 10.5.0.255 scope global eth1
    inet6 fe80::5054:ff:fef7:76ec/64 scope link
       valid_lft forever preferred_lft forever
hostA # ip route
10.5.0.0/24 dev eth1  proto kernel  scope link  src 10.5.0.37
192.168.122.0/24 dev eth0  proto kernel  scope link  src 192.168.122.133
default via 10.5.0.254 dev eth1
Note: Default route is through external interface eth1
hostA # traceroute -n 192.168.122.110
traceroute to 192.168.122.110 (192.168.122.110), 30 hops max, 60 byte packets
 1  192.168.122.110  0.596 ms !X  0.539 ms !X  0.526 ms !X
hostA # traceroute -n 192.168.42.1
traceroute to 192.168.42.1 (192.168.42.1), 30 hops max, 60 byte packets
 1  10.5.0.254  0.590 ms  0.518 ms  0.503 ms
 2  192.168.42.1  7.454 ms  7.488 ms  7.477 ms
hostA # traceroute -n 192.168.122.133
traceroute to 192.168.122.133 (192.168.122.133), 30 hops max, 60 byte packets
 1  192.168.122.133  0.210 ms !X  0.095 ms !X  0.418 ms !X
hostA # traceroute -n 192.168.42.1
traceroute to 192.168.42.1 (192.168.42.1), 30 hops max, 60 byte packets
 1  192.168.122.1  0.759 ms  0.651 ms  0.597 ms
 2  10.5.0.254  0.576 ms  0.568 ms  0.554 ms
 3  192.168.42.1  4.150 ms  4.150 ms  4.130 ms
Note 1st hop is to hypervisor NAT interface 192.168.122.1
Converting a dual homed host into a route are just the steps required to set up a Linux based router
This is left as an exersize for the student :-)
Are there newer routing protocols that would work better?